

Gravy is the unsung hero of many meals, transforming ordinary dishes into extraordinary culinary experiences. Whether you’re preparing a weeknight dinner or a holiday feast, having a go-to gravy recipe in your arsenal is essential. This foolproof method will guide you through creating a velvety smooth, rich gravy that will have your family and guests begging for seconds. Get ready to elevate your cooking game and become the gravy guru you’ve always aspired to be!
The Foundation of Great Gravy: The Perfect Roux
At the heart of any exceptional gravy lies a well-executed roux. This magical mixture of fat and flour is the key to achieving that silky smooth texture we all crave. To create the perfect roux, start by melting butter in a saucepan over medium heat. Once the butter is bubbling, gradually whisk in an equal amount of all-purpose flour. The key here is to cook the roux until it reaches a golden caramel color, which typically takes about 5-7 minutes.
As you cook the roux, you’ll notice the aroma becoming increasingly nutty and complex. This transformation is crucial, as it not only deepens the flavor of your gravy but also eliminates any raw flour taste. Keep whisking constantly to prevent burning and ensure even cooking. The color of your roux will directly impact the final color and flavor of your gravy, so don’t rush this step!
For those who want to take their gravy-making skills to the next level, consider investing in a quality flat whisk. This tool is specifically designed for making roux and sauces, allowing you to reach every corner of the pan and achieve a perfectly smooth consistency.
Tip: If you’re short on time, you can make the roux in advance and store it in an airtight container in the refrigerator for up to a week. Simply reheat it gently before proceeding with your gravy recipe.
Once your roux has reached the desired golden hue, it’s time to transform it into luscious gravy. This is where the magic happens, and your patience in perfecting the roux will pay off in spades. The next step is crucial: slowly incorporate your liquid of choice. This could be pan drippings from your roasted meat, homemade or store-bought broth, or a combination of both.
The key to avoiding lumps is to add the liquid gradually while whisking vigorously. Start with just a small amount, about 1/4 cup, and whisk until the mixture is smooth before adding more. This gradual process allows the roux to fully incorporate the liquid, resulting in a silky smooth gravy. Continue adding liquid and whisking until you’ve reached your desired consistency, remembering that the gravy will thicken slightly as it cools.
Elevating Your Gravy Game: Flavor Boosters and Pro Tips
Now that you’ve mastered the basics, it’s time to take your gravy to the next level with some flavor-enhancing techniques. One game-changing tip is to add a spoonful of bouillon paste to your gravy. This concentrated flavor bomb will add depth and richness that will have everyone wondering about your secret ingredient. For those who prefer a more natural approach, consider simmering herbs like thyme, rosemary, or sage in your gravy for an aromatic twist.
Another pro tip is to deglaze your roasting pan before making the gravy. After removing your roasted meat, place the pan over two burners on low heat. Add a splash of wine, broth, or even water, and use a wooden spoon to scrape up all those flavorful browned bits stuck to the bottom of the pan. This liquid gold can then be incorporated into your gravy for an extra layer of savory goodness.
For those who love a bit of texture in their gravy, consider adding finely minced mushrooms or caramelized onions. These additions not only provide interesting texture but also contribute to a more complex flavor profile. Just be sure to cook them thoroughly before adding them to your gravy to ensure they blend seamlessly.
Tip: To achieve a silky smooth consistency, use a handheld immersion blender to blend your gravy right in the pan. This will emulsify any remaining lumps and create a velvety texture that coats the back of a spoon beautifully.
Don’t be afraid to experiment with different liquids when making your gravy. While chicken or beef broth are classic choices, consider using white wine, apple cider, or even coconut milk for a unique twist. These alternative liquids can complement specific dishes and add an unexpected layer of flavor that will keep your guests guessing.
Troubleshooting and Make-Ahead Magic
Even the most experienced cooks occasionally encounter gravy mishaps. But fear not! Most gravy issues have simple solutions. If your gravy is too thin, whisk in a cornstarch slurry (equal parts cornstarch and cold water) and simmer until thickened. If it’s too thick, gradually whisk in additional broth or water until you reach the desired consistency.
For those who want to reduce stress during meal preparation, especially for big events like Thanksgiving, making gravy in advance is a game-changer. You can prepare your gravy up to three days ahead of time and store it in an airtight container in the refrigerator. When ready to serve, simply reheat it over low heat, whisking constantly to restore its smooth consistency. If needed, thin it out with a bit of broth or water.
To ensure your make-ahead gravy is just as delicious as freshly made, consider using a fat separator when working with pan drippings. This handy tool allows you to easily remove excess fat while retaining all the flavorful juices, resulting in a cleaner, more balanced gravy that reheats beautifully.
Tip: If you’re making gravy for a crowd, don’t be shy about doubling or even tripling the recipe. Leftover gravy can be frozen for up to three months, giving you a head start on future meals.
Remember, the key to perfect gravy is practice and patience. Don’t be discouraged if your first attempt isn’t flawless – each batch will bring you closer to gravy perfection. Soon, you’ll be whipping up silky smooth, flavorful gravy with the confidence of a seasoned chef, impressing family and friends with your culinary prowess.
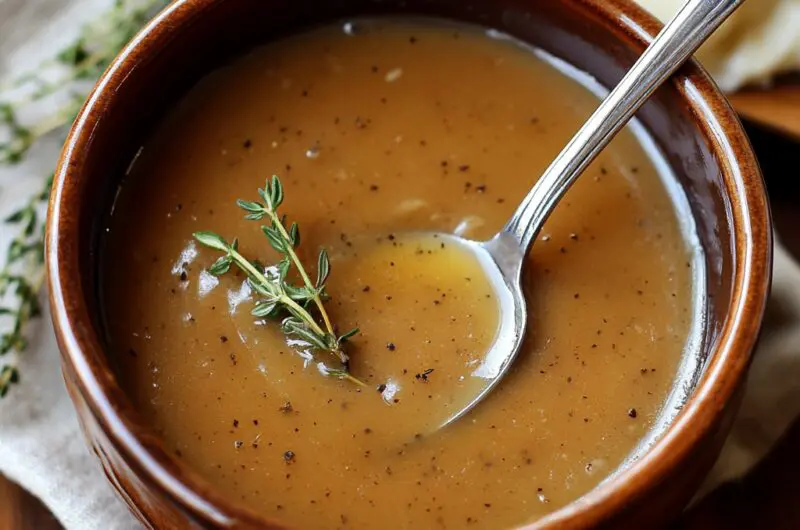
Whether you’re pouring it over mashed potatoes, smothering it on biscuits, or using it to enhance your favorite roast, this versatile gravy recipe is sure to become a staple in your kitchen. With its rich flavor, velvety texture, and endless possibilities for customization, you’ll find yourself looking for excuses to make gravy more often. So roll up your sleeves, grab your whisk, and get ready to create gravy magic that will have everyone at the table asking for seconds!
Perfect Homemade Gravy
Course: SauceCuisine: American4
servings30
minutes40
minutes300
kcalMaster the art of silky smooth, rich gravy with this foolproof recipe that will elevate any meal from ordinary to extraordinary.
Ingredients
1/4 cup unsalted butter
1/4 cup all-purpose flour
2 cups hot chicken or beef broth
1/2 cup pan drippings (optional)
1 teaspoon bouillon paste (optional)
Salt and freshly ground black pepper, to taste
1 tablespoon fresh herbs (thyme, rosemary, or sage), finely chopped (optional)
Directions
- In a medium saucepan, melt the butter over medium heat. Once the butter is fully melted and bubbling, gradually whisk in the flour to create a roux. Continue cooking, whisking constantly, until the roux turns a golden caramel color, about 5-7 minutes. This process is crucial for developing a deep, rich flavor in your gravy.
- Slowly pour in the hot broth, about 1/4 cup at a time, whisking vigorously after each addition to prevent lumps from forming. The mixture will be very thick at first but will gradually thin out as you add more liquid. If using pan drippings, add them along with the broth. Continue this process until all the liquid has been incorporated and the gravy is smooth.
- Bring the gravy to a gentle simmer and cook for about 5 minutes, stirring frequently. The gravy will continue to thicken as it simmers. If it becomes too thick, gradually whisk in additional hot broth until you reach your desired consistency. Remember that the gravy will thicken slightly as it cools.
- If using, stir in the bouillon paste for an extra flavor boost. Season the gravy with salt and pepper to taste. Be cautious with salt, especially if you’ve used salted broth or pan drippings. Add the fresh herbs if using, stirring to distribute them evenly throughout the gravy.
- For an extra smooth gravy, pass it through a fine-mesh strainer before serving. This step is optional but will ensure a silky texture. If desired, you can use an immersion blender to further emulsify the gravy and create an ultra-smooth consistency.
- Serve the gravy hot over your favorite dishes, such as roasted meats, mashed potatoes, or stuffing. If not serving immediately, keep the gravy warm over low heat, stirring occasionally to prevent a skin from forming on the surface. Add a splash of hot broth if needed to maintain the desired consistency.
Notes
- For a gluten-free version, substitute the all-purpose flour with cornstarch or a gluten-free flour blend.
- If making gravy in advance, refrigerate in an airtight container for up to 3 days. Reheat gently on the stovetop, whisking constantly and adding extra broth as needed to reach the desired consistency.
- Experiment with different liquids like white wine or apple cider to deglaze the pan for added flavor depth.
Frequently Asked Questions
Q: How can I fix lumpy gravy?
A: If you end up with lumpy gravy, don’t worry! There are a few ways to salvage it. First, try whisking vigorously to break up the lumps. If that doesn’t work, you can pour the gravy through a fine-mesh strainer to remove any remaining lumps. For stubborn lumps, use an immersion blender to smooth out the gravy. In the future, remember to add the liquid gradually to the roux and whisk constantly to prevent lumps from forming.
Q: Can I make gravy without pan drippings?
A: Absolutely! While pan drippings add extra flavor, you can make delicious gravy using just butter and broth. Follow the recipe as directed, using all broth instead of a combination of broth and drippings. To boost the flavor, you can add a teaspoon of bouillon paste or some finely minced sautéed onions and garlic to the roux before adding the broth.
Q: How long can I store homemade gravy?
A: Homemade gravy can be stored in an airtight container in the refrigerator for up to 3-4 days. For longer storage, you can freeze gravy for up to 3 months. When ready to use, thaw frozen gravy in the refrigerator overnight and reheat gently on the stovetop, whisking constantly and adding a bit of extra broth if needed to reach the desired consistency.
Q: How can I make my gravy darker or lighter in color?
A: The color of your gravy is primarily determined by how long you cook the roux. For a lighter gravy, cook the roux for a shorter time, just until it’s a light golden color. For a darker gravy, cook the roux longer until it reaches a deep golden brown color. Keep in mind that the longer you cook the roux, the nuttier and more complex the flavor will become. You can also adjust the color by using different types of broth – beef broth will result in a darker gravy than chicken broth.