

The grilled cheese sandwich you’ve been making all these years might just be a pale imitation of its true potential. That’s right, the comfort food staple you thought you’d mastered is about to get a major upgrade. From the choice of bread to the secret spreads and even the cooking technique, we’re about to flip everything you know about grilled cheese on its perfectly toasted head. Get ready to elevate your sandwich game and discover why your grilled cheese has been all wrong – and how to make it oh-so-right.
The Bread Breakthrough
Let’s start with the foundation of any great grilled cheese: the bread. If you’ve been grabbing any old slice from the bread box, it’s time for a change. The key to a perfect grilled cheese starts with selecting the right bread. Forget those flimsy, pre-sliced varieties. Instead, opt for a hearty sourdough or a classic white bread with some substance.
But here’s where things get interesting. You know how you’ve always slathered butter on the outside of your bread? Well, prepare to have your mind blown. The secret to achieving that coveted golden-brown, crispy exterior isn’t butter at all – it’s mayonnaise. Yes, you read that right. Mayo’s higher smoke point and the combination of oil and egg yolks create a perfectly crisp and evenly browned crust that butter simply can’t match.
Now, don’t worry, butter lovers. We haven’t forgotten about you. Instead of spreading it on the outside, try melting a pat of butter in the pan before cooking. This not only adds flavor but also ensures even heating and prevents any chance of burning.
Tip: For an extra flavor boost, add a thin spread of Dijon mustard to the inside of one bread slice. It adds a subtle tang that complements the rich cheese perfectly.
Speaking of cheese, let’s talk about the star of the show. If you’ve been using pre-sliced American cheese, it’s time for an intervention. While American cheese does melt beautifully, there’s a whole world of cheese combinations waiting to tantalize your taste buds.
Try a mix of sharp cheddar for flavor and Gruyère or raclette for that ooey-gooey meltability. The key is to grate your cheese instead of using slices. This might seem like extra work, but trust us, it’s worth it. Grated cheese melts more evenly and creates pockets of melty goodness throughout your sandwich.
The Melt Master Method
Now that we’ve got our ingredients sorted, let’s talk technique. The biggest mistake most people make when cooking grilled cheese is cranking up the heat. High heat might seem like a shortcut to a quick meal, but it’s a one-way ticket to burnt bread and unmelted cheese.
Instead, embrace the slow and steady approach. Medium-low heat is your best friend here. It allows the cheese to melt gradually while the bread achieves that perfect golden-brown color. But we’re not stopping there. To take your grilled cheese game to the next level, try the two-pan method.
Here’s how it works: You’ll need two well-seasoned cast iron skillets, one slightly smaller than the other. Heat both pans over medium-low heat. Build your sandwich in the larger pan, then place the smaller pan on top of the sandwich, pressing down gently. The weight of the second pan helps create even contact between the bread and the cheese, resulting in the ultimate melty experience.
Tip: For the perfect cheese pull, let your grilled cheese rest for a minute or two after cooking. This allows the cheese to set slightly, giving you that Instagram-worthy stretch when you pull it apart.
But wait, there’s more! If you really want to ensure every bit of cheese reaches its melty potential, try this pro move: cover your pan with a lid while cooking. This traps the steam and helps the cheese melt even faster and more evenly.
Now, let’s talk about flipping. We know it’s tempting to keep checking and flipping your sandwich, but resist the urge. Give each side about 3-4 minutes of uninterrupted cooking time. This allows the bread to develop that perfect crust and the cheese to melt thoroughly.
Elevate Your Grilled Cheese Game
Now that you’ve mastered the basics, it’s time to take your grilled cheese to gourmet heights. The beauty of this classic sandwich is its versatility. Don’t be afraid to experiment with add-ins and flavor combinations.
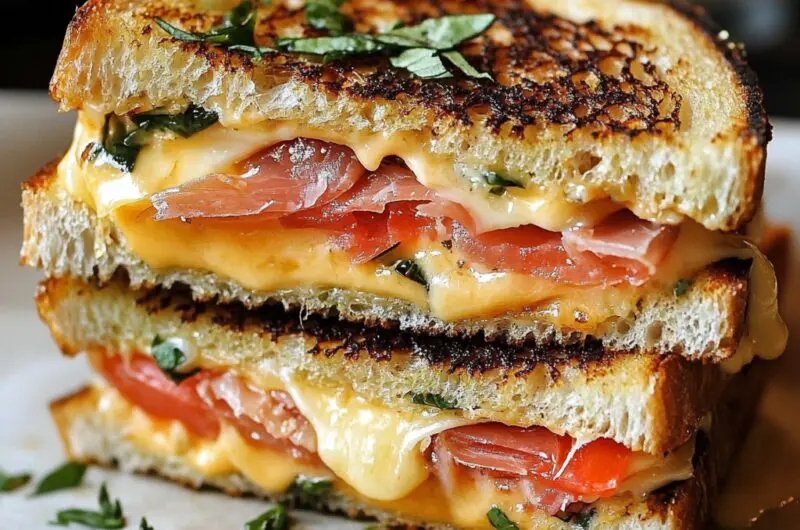
For a Mediterranean twist, try adding some sun-dried tomatoes and fresh basil leaves. Craving something with a kick? Pickled jalapeños and pepper jack cheese might be just what you need. And for those who like it sweet and savory, a thin layer of fig jam paired with prosciutto and brie creates a grilled cheese that’s truly restaurant-worthy.
But remember, when adding extras, less is often more. You don’t want to overpower the cheese or make your sandwich so thick that it doesn’t cook evenly. Balance is key when it comes to creating the perfect grilled cheese.
Tip: If you’re adding vegetables or fruits to your grilled cheese, consider cooking them slightly beforehand to remove excess moisture. This prevents your sandwich from becoming soggy.
Now, let’s talk tools. While you can certainly make a great grilled cheese with just a pan and a spatula, having the right equipment can elevate your sandwich-making experience. Consider investing in a quality cast iron skillet. Not only does it provide even heat distribution, but it also adds a subtle flavor that improves with each use.
For those who frequently make grilled cheese for a crowd, a large electric griddle can be a game-changer. It allows you to cook multiple sandwiches at once, ensuring everyone gets their grilled cheese fix at the same time.
Lastly, don’t underestimate the power of a good spatula. A wide, flexible spatula makes flipping your sandwich a breeze and helps you achieve that perfect press without squishing all the delicious fillings out.
There you have it, folks – the secrets to creating the ultimate grilled cheese sandwich. From the unexpected use of mayonnaise to the two-pan cooking method, these techniques will transform your humble grilled cheese into a gourmet masterpiece. So the next time you’re craving this classic comfort food, remember: you’re not just making a sandwich, you’re crafting a work of art. Now go forth and grill with confidence, knowing that your grilled cheese game is officially on point!
The Ultimate Gourmet Grilled Cheese
Course: Main CourseCuisine: American2
sandwiches10
minutes10
minutes450
kcal20
minutesElevate your sandwich game with this mouthwatering gourmet grilled cheese that’s crispy, gooey, and bursting with flavor.
Ingredients
4 slices sourdough bread
2 tablespoons mayonnaise
1 tablespoon butter
1 teaspoon Dijon mustard
2 ounces sharp cheddar cheese, grated
2 ounces Gruyère cheese, grated
2 thin slices of prosciutto (optional)
2 thin slices of tomato (optional)
Fresh basil leaves (optional)
Directions
- Begin by preparing your ingredients. Grate the cheddar and Gruyère cheeses and set them aside. If using, pat dry the tomato slices and prosciutto with paper towels to remove excess moisture. This will help prevent your sandwich from becoming soggy.
- Spread a thin layer of mayonnaise on one side of each slice of bread. This will create a beautifully golden and crispy exterior. On the other side of two slices, spread a thin layer of Dijon mustard for an extra flavor kick.
- Heat a large skillet or griddle over medium-low heat. Add the butter and let it melt, swirling to coat the pan evenly. This will add richness and help prevent sticking.
- Place two slices of bread in the pan, mayonnaise side down. Quickly add a layer of grated cheddar to each slice, followed by the prosciutto and tomato slices if using. Top with the Gruyère cheese and a few fresh basil leaves if desired.
- Cover the pan with a lid to trap the heat and help the cheese melt evenly. Cook for about 3-4 minutes, or until the bottom of the bread is golden brown and the cheese starts to melt.
- Remove the lid and top each sandwich with the remaining bread slices, mayonnaise side up. Press down gently with a spatula to ensure even cooking and melting.
- Carefully flip the sandwiches and cook for an additional 2-3 minutes, or until the second side is golden brown and the cheese is fully melted. If needed, adjust the heat to prevent burning.
- Remove the sandwiches from the pan and let them rest for 1-2 minutes before cutting diagonally. This brief rest allows the cheese to set slightly, giving you that perfect cheese pull when you take your first bite.
Notes
- For an extra crispy exterior, try using a cast-iron skillet. It retains heat well and creates an even cooking surface.
- Experiment with different cheese combinations. A mix of melty and flavorful cheeses works best.
- If your bread is browning too quickly before the cheese melts, lower the heat and cover the pan with a lid.
Frequently Asked Questions
Q: Can I use pre-sliced cheese instead of grating my own?
A: While pre-sliced cheese can work, grating your own cheese is recommended for better melting and distribution. Pre-shredded cheese often contains anti-caking agents that can affect its melting properties. Freshly grated cheese also allows you to create a custom blend of flavors.
Q: Is it really necessary to use mayonnaise on the outside of the bread?
A: While not absolutely necessary, using mayonnaise on the outside of the bread instead of butter can lead to a more evenly golden and crispy exterior. The higher smoke point of mayonnaise allows for better browning without burning. If you prefer, you can still use butter, but make sure it’s at room temperature for easy spreading.
Q: How can I prevent my grilled cheese from becoming soggy?
A: To prevent sogginess, make sure to pat dry any moist ingredients like tomatoes or prosciutto before adding them to your sandwich. Also, avoid overloading your sandwich with too many ingredients. If using particularly moist fillings, you can lightly toast the bread before assembling the sandwich to create a barrier against moisture.
Q: What’s the best way to reheat leftover grilled cheese?
A: While grilled cheese is best enjoyed fresh, you can reheat leftovers. The best method is to reheat it in a skillet over medium-low heat, which will help maintain the crispy exterior. Place the sandwich in the skillet and cover with a lid to help the cheese re-melt. Avoid using the microwave as it can make the bread soggy.