

Welcome to the no-bake heaven, where the sweetness of Oreos blends effortlessly with the rich creaminess of cheesecake. Today, we’re diving headfirst into the world of no-bake desserts with a simple yet scrumptious Oreo cheesecake recipe. This sweet indulgence is not just easy to make but is also a guaranteed crowd-pleaser. So, put on your apron, and let’s get whisking!
Let’s Talk Ingredients
The beauty of this No-Bake Oreo Cheesecake lies in its simplicity, with the ingredients being easily accessible. The star of the show is, of course, the Oreos. This beloved cookie lends the cheesecake its unique flavor and crunchy base. You can grab a pack of Oreos here.
Next up, we have cream cheese, the heart and soul of any cheesecake. Its velvety texture and subtle tanginess balance the sweetness of the Oreos perfectly. You’ll also need some heavy cream for that extra richness, and granulated sugar to sweeten things up.
Tip: Always use fresh, high-quality ingredients for the best results.
Getting Down to Baking…Or Not!
While traditional cheesecake recipes require baking, our No-Bake Oreo Cheesecake eliminates this step entirely. This makes it an ideal recipe for beginners or those who don’t own an oven. The key to a successful no-bake cheesecake is allowing ample time for it to set in the refrigerator.
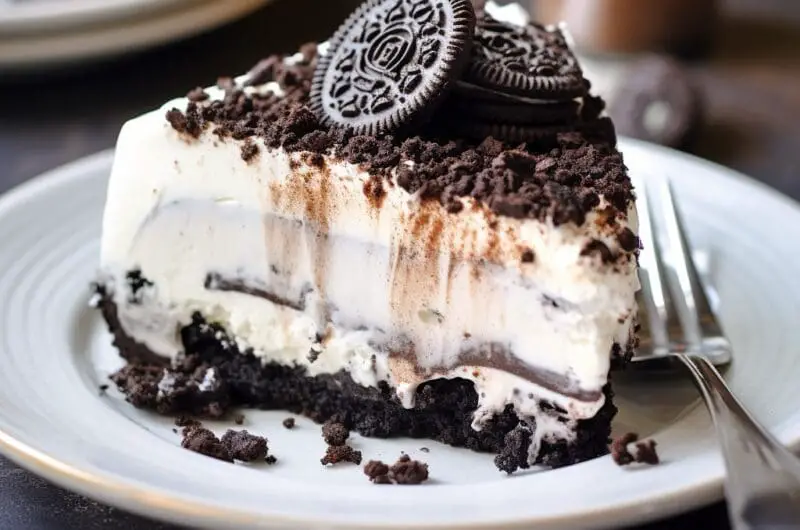
Also, remember that the texture of a no-bake cheesecake differs slightly from its baked counterpart. It’s lighter, creamier, and has a mousse-like consistency that’s simply irresistible.
Tip: Be patient and allow the cheesecake to set properly for the best texture.
The Art of the Perfect Cheesecake Base
The base of the cheesecake is what gives it that delightful crunch with every bite. For our No-Bake Oreo Cheesecake, the base is made from crushed Oreos and melted butter. The key is to crush the Oreos finely to ensure a solid and even base. You can use a food processor like this one here to get the job done quickly and efficiently.
Once you’ve got your Oreo crumbs, mix them with melted butter until they resemble wet sand. Press this mixture into your pan and refrigerate to set. Voila! You have your perfect cheesecake base.
Tip: Make sure to press the Oreo-butter mixture firmly into the pan for a sturdy base.
Whip it, Whip it Good
The filling of the No-Bake Oreo Cheesecake requires a bit of arm strength as you’ll be doing quite a bit of whipping. Start by beating the cream cheese until it’s smooth and creamy. Then, whip the heavy cream until it forms stiff peaks. Fold these two together gently to maintain the airy texture. Add in the sugar and crushed Oreos, and your filling is ready to go.
An electric mixer or stand mixer can make this step a breeze. If you don’t own one, you can get it here.
Tip: Don’t overmix the filling as it can result in a dense cheesecake.
The Waiting Game
After you’ve assembled your cheesecake, it’s time to play the waiting game. Refrigerate your cheesecake for at least 6 hours, or better yet, overnight. This step is crucial to allow the cheesecake to set properly and develop its flavors.
Once it’s set, garnish with some whipped cream and crushed Oreos, and your No-Bake Oreo Cheesecake is ready to serve.
Tip: Use a hot knife to cut clean slices of cheesecake.
So there you have it, folks! A mouthwatering No-Bake Oreo Cheesecake that’s as easy as pie. This dessert is perfect for any occasion, be it a birthday party, a potluck, or just a regular Tuesday. So go ahead, give this recipe a whirl and get ready to dazzle your taste buds. Happy no-baking!
No-Bake Oreo Cheesecake
Course: DessertCuisine: American4
servings30
minutes40
minutes300
kcalA simple yet delicious no-bake Oreo cheesecake that’s a sure crowd-pleaser.
Ingredients
24 Oreos, crushed
5 tablespoons butter, melted
16 oz cream cheese, softened
1 cup granulated sugar
1 cup heavy cream
1 teaspoon vanilla extract
Directions
- In a bowl, combine crushed Oreos and melted butter until it resembles wet sand. Press this mixture into the bottom of a springform pan and refrigerate to set.
- In another bowl, beat the cream cheese until smooth. In a separate bowl, whip the heavy cream until it forms stiff peaks. Fold the whipped cream into the cream cheese gently.
- Add in the sugar and vanilla extract and mix until well incorporated. Stir in the crushed Oreos.
- Pour the filling over the set base and smooth the top. Refrigerate for at least 6 hours or overnight.
- Before serving, garnish with whipped cream and crushed Oreos. Enjoy your No-Bake Oreo Cheesecake!
Notes
- Ensure all your ingredients are at room temperature for the best results.
- Be patient and allow the cheesecake to set properly for the best texture.
- Store leftover cheesecake in the refrigerator for up to 3 days.
Frequently Asked Questions
Q: Can I use other cookies for the base?
A: Absolutely! You can use graham crackers, Digestive biscuits, or any cookie of your choice.
Q: Can I freeze this cheesecake?
A: Yes, you can freeze the cheesecake for up to a month. Just make sure to wrap it tightly to prevent freezer burn.
Q: Can I use low-fat cream cheese?
A: Yes, but it may alter the texture and richness of the cheesecake.
Q: Can I add in other flavors?
A: Definitely! Feel free to add in some lemon zest, chocolate chips, or even a splash of your favorite liqueur.